
A VPN tunnel connects SmartOLT to your private network. Through the tunnel, SmartOLT reaches your OLTs and the management IPs of your ONUs at their private addresses.
One tunnel can serve several OLTs and all their ONUs, if the router at the end of the tunnel reaches them. You can create as many tunnels as you need, for example one for each site.
The tunnel ends on a router in your network that can reach your OLTs and ONUs. This router can be a MikroTik (WireGuard or OpenVPN) or an IPsec router such as FortiGate, NE8000, Juniper or Sophos.
The examples in this guide use these values:
| Value | Example |
|---|---|
| Tunnel subnet | 10.69.69.0/24 |
| OLT network | 192.168.50.0/24 |
| ONU management network | 10.50.61.0/24 |
1Create the tunnel
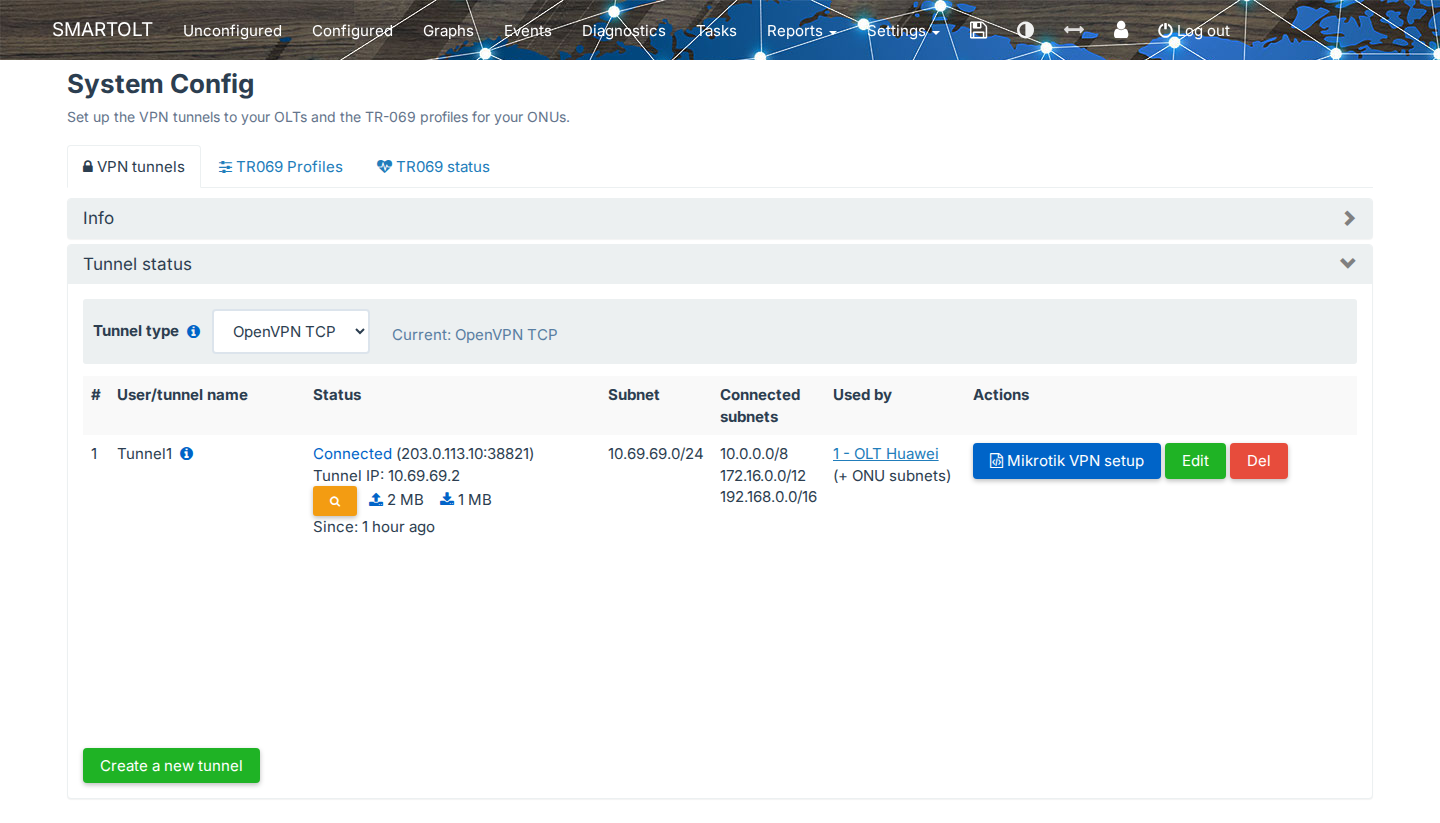
Go to Settings → VPN & TR069, where the VPN tunnels tab lists your tunnels. Click Create a new tunnel. The Create a new VPN tunnel window opens with the settings already filled in. You can keep them, or you can enter your own private subnets in Tunnel routes. Click Add tunnel.
| Column | Content |
|---|---|
| Status | Shows Connected when the tunnel is up. Tunnel IP is the address of your MikroTik inside the tunnel. |
| Subnet | The private network inside the VPN tunnel, between SmartOLT and your MikroTik, for example 10.69.69.0/24. SmartOLT has one address in this network and your MikroTik has another. SmartOLT sets this network for you, so you do not need to change it. |
| Connected subnets | The networks that SmartOLT reaches through the tunnel. You set them in Tunnel routes when you edit the tunnel. |
| Used by | The OLTs that use the tunnel. |
The Tunnel type field on the VPN tunnels tab sets the protocol of all VPN tunnels. Select a type and click Apply. The Compare protocols link shows the table below.
| Tunnel type | Speed | Router CPU | Works on |
|---|---|---|---|
| WireGuard | Fastest | Low | RouterOS 7.12.1 or newer |
| OpenVPN UDP | Medium | High | RouterOS 7.12.1 or newer |
| OpenVPN TCP | Slowest | High | RouterOS 6 or newer |
| IPsec (IKEv2, pre-shared key) | High with hardware acceleration | Low with hardware acceleration, medium without | FortiGate, NE8000, Juniper, Sophos etc. |
For a MikroTik with RouterOS 7.12.1 or newer, we recommend WireGuard.
The tunnel type applies to all VPN tunnels. After you change it, apply the VPN setup again on every router. Routers that stay on the old type lose their connection.
2Apply the VPN setup on the router
On the row of the tunnel, click VPN setup. For a MikroTik tunnel (WireGuard or OpenVPN), the VPN setup window shows a VPN setup script for RouterOS.
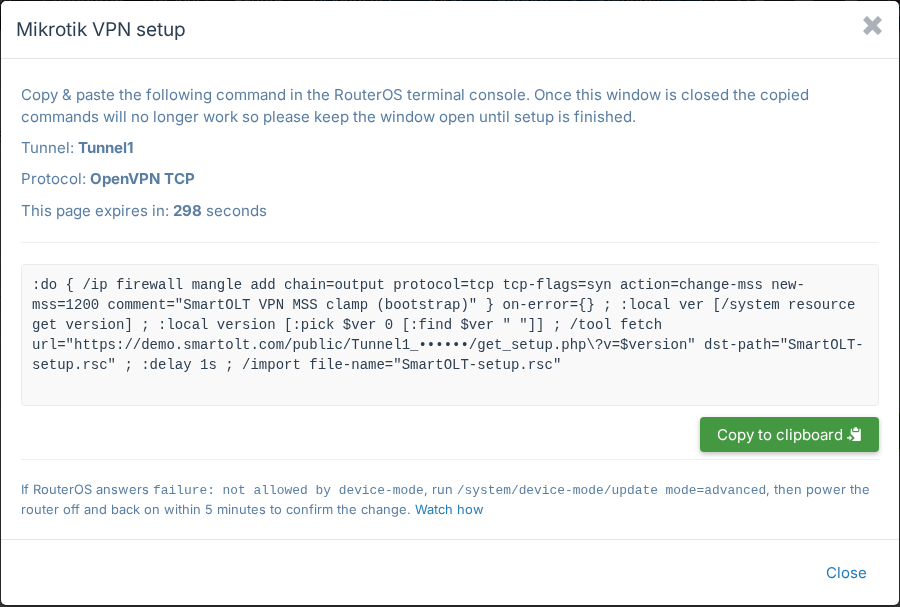
- Click Copy to clipboard.
- On the MikroTik, open New Terminal and paste the script.
- Keep the window open until the setup finishes, because the VPN setup script is valid only for a short time, while the SmartOLT setup window is open.
If RouterOS answers failure: not allowed by device-mode, follow step 5.
3Add your networks to the tunnel routes
SmartOLT sends through the tunnel only the traffic for the networks in Tunnel routes. If the address of an OLT or of an ONU is not in one of these networks, SmartOLT cannot reach it.
On the row of the tunnel, click Edit. In the Edit tunnel window, enter in Tunnel routes the subnets of your OLTs and of the ONU management IPs, one per line. Then click Save changes.
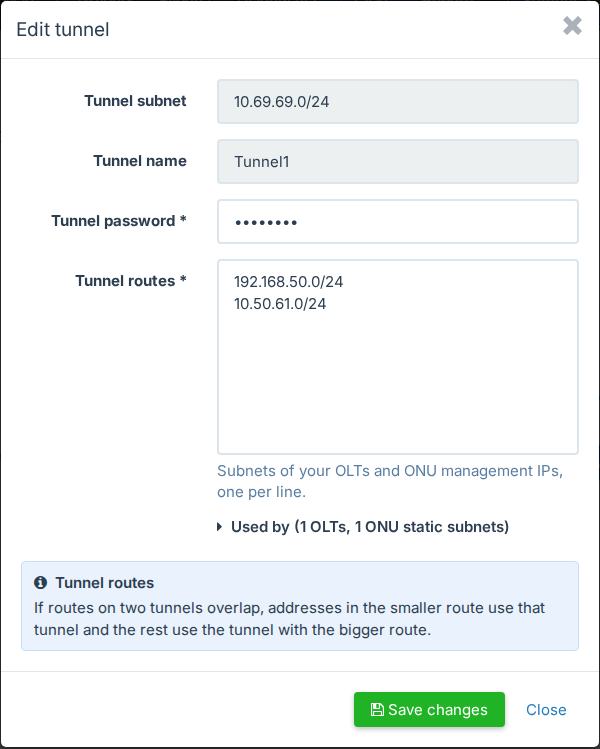
In this example, 192.168.50.0/24 is the OLT network and 10.50.61.0/24 is the ONU management network. A larger route also works. For example, 10.0.0.0/8 includes 10.50.61.0/24.
Below the field, Used by lists the OLTs and the ONU subnets that already use the tunnel.
Each tunnel needs its own routes. If you have sites that are not connected to each other, create one tunnel for each site and enter the networks of that site. If the routes of two tunnels overlap, the addresses in the smaller route use that tunnel and the rest use the tunnel with the bigger route.
The router must not NAT the traffic between the tunnel and your OLT and ONU networks. The MikroTik configuration that SmartOLT generates already excludes the tunnel from NAT.
4Check that the tunnel is connected
Reload the VPN tunnels page a few times. When the tunnel is up, Status shows Connected, the public address of your router and its Tunnel IP.
To test the tunnel, click the orange button with the magnifier under Status. The VPN tunnel diagnosis window shows the state of the tunnel and a Ping button for the address of the router.
Then check one device behind the tunnel. For example, add the OLT with its private IP address, as in Add the OLT.
5If the tunnel does not connect
Open the VPN tunnel diagnosis window, as in step 4. It shows the cause that SmartOLT found. These are the most common causes:
| What you see | What to do |
|---|---|
| No router ran the setup script for this tunnel recently, and no router connected to it. | Apply the VPN setup on the router again, as in step 2. |
The router answers failure: not allowed by device-mode. |
Change the device-mode of the MikroTik, as in the steps below. |
| The diagnosis says that the router does not receive the server replies. | A firewall rule, a NAT rule or an MTU problem in your network drops the replies. Allow the traffic from the addresses that the message shows. |
| Tunnel conflict detected | Two routers use the same tunnel. Use a tunnel on one router only. For a second router, create a new tunnel. |
| Connected, but SmartOLT cannot reach an OLT or an ONU. | Check that the network of the device is in Tunnel routes, as in step 3. Then check that the router can ping the device. |
If RouterOS answers "failure: not allowed by device-mode"
Newer MikroTik devices start in a restricted device-mode. In this mode, RouterOS blocks some commands that the VPN setup script needs, for example /tool fetch. So the terminal shows failure: not allowed by device-mode and RouterOS does not create the tunnel.
-
In the MikroTik terminal, run:
/system/device-mode/update mode=advanced -
Within 5 minutes, disconnect the router from power and connect it again. RouterOS applies the new mode only after this real power cycle.
-
Check the mode:
/system/device-mode/printThe output must show
mode: advanced. -
In SmartOLT, open VPN setup again, copy the script and paste it into the MikroTik terminal. Do this while the window is open, because the VPN setup script is valid only for a short time.
A restart from the terminal or from Winbox does not confirm the change. You must disconnect the power and connect it again.
Next steps
The tunnel is now connected. Next, add your OLT with its private IP address in Add an OLT and check its status. To manage the ONUs over TR-069, follow Configure TR-069.